Porsche Folio "Articles & Guides"
Replacing the Porsche Crest on the 911 Bonnet

The Porsche crest has been located on the bonnet of the 911 since time began. It's one of the features that sets the Porsche apart from other cars. Unfortunately set atop the bonnet at the front of car, the Porsche crest can take a real battering. Not just from road debris, dirt, dust and grit, but also from owners themselves using the crest as a pad on which to push the bonnet closed. Luckily the crest is easily replaced, doesn't cost a fortune and quickly restores that prestigious look to your Porsche.
Don't think about trying to save money by buying a cheap aftermarket crest. They are cheap for a reason. They are often of inferior quality. The original equipment crests available from Porsche are your best option. They are manufactured to a higher quality and noticeably better.
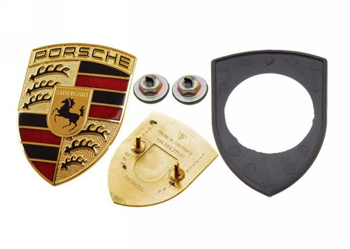
The Porsche crest has changed very subtly over the years and there are two different designs. Once for pre 1989 are different from those that came afterwards. Make sure you get one that matches your existing one or that is right for your year of Porsche. Make sure you also get a rubber sealing gasket that sits between the crest and the bonnet.
The crest is attached to the Porsche bonnet by two aluminium speed nuts tightened to two threaded studs which protrude from the back of the Porsche crest. They use a soft metal like aluminium to ensure you don't damage your Porsche's paintwork.
To remove the old crest first, open the bonnet and unscrew the nuts using an 8mm socket and if necessary, a socket extension. Before installing the new crest, first place the rubber sealing gasket around the crest and test fit it against the surface of the bonnet. Be delicate when handling the crest and especially the threaded studs. They are easily broken.
Some quick tips to make life a little easier; with a small piece of masking tape, stick the crest and seal to the bonnet before you install it. This will keep things in place while you fiddle with the speed nuts and sockets. Use a small dental pick or thin bladed knife to fit the gasket around the crest before it's completely tightened down. Don't be in a hurry. Go slowly, and check the rubber seal is properly in place before you tighten up the nuts. This is a very simple job. It should only take a few minutes, but care should be taken to ensure you don't mess things up.
Get Involved in the dicussion
We think it's better to talk and would love to hear your thoughts on this article topic. Simply scroll down to read what other Channel P101tv members are saying about this article. Why not add your say. Your comments belong here! You can scroll to the end of the page or Click here to add your comments now.There's Plenty of Articles & Guides
Our Porsche Articles and Guides archives are constantly growing. Take a look through the archives from the Articles menu or click on a preview from the carousel below.
Feel Free to Join in!
If you would like to join in, we would welcome your ideas for an artcle. If there's subject that you'd like to write about then get in touch and let us know. If the topic fits the reader's corner then we'd be pleased to publish it. You will of course receive full credit for the article as well as a link back your Channel P101tv Profile.Have we missed something or feel something should be added?
If there's something missing that you feel needs to be included or if something doesn't seem quite right, then please let us know. If you'd like to write an article for inclusion here then please get in touch. Just click on "Contact us" at the bottom of the page.
We hope you enjoy the Reader's Corner of the Porsche Folio!


