# Channel P101tv | How to Chip your Porsche 911 3.2 Carrera

Porsche Folio "Articles & Guides"

Chipping the ECU on a Porsche 911 3.2 Carrera

The Porsche 911 3.2 Carrera was the first road going 911 to boast an Electronic Control Unit, or ECU, for engine management (Porsche also called this Digital Engine Management, or DME). This paved the way for engine tuners to modify the engine maps for increased performance from the Porsche stock configuration. By tuning the engine in this new digital way, aftermarket tuners are able to alter ignition timing, fuel mixture and maximum RPM fo the rev limiter. The following article has kindly been written by Channel P101tv member "ItsAnInvestment". He chose the aftermarket ECU chip developed by Steve Wong.

The gospel according to Steve
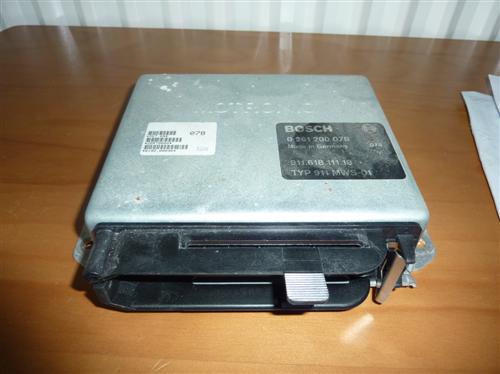
Porsche 911 3.2 Carerra DME

Dearly beloved we are gathered here today to gape in awe at the smoother running, linear torque and response curves provided through the almighty Wong chip.

I admit to being bit of geek but even the non geek amongst us should have the chip installed and working within 30 minutes. I know Steve's instructions boast a mere 20 minutes, but it takes a couple of goes to get it down to that. The instructions that come with the chip are very good, but to give you a taste of what you need to do I have put together a few pointers which should help the uninitiated.

Tools Required
Suprisingly, you only need a few pieces of of kit from your toolbag:
▶ 10mm socket spanner
▶ Pliers
▶ Non magnetic flat and cross headed screwdrivers
A Step by Step Guide
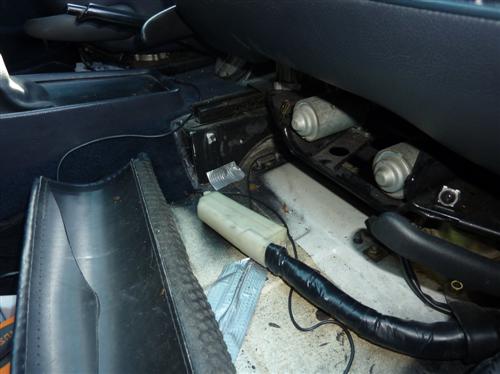
Porsche 911 3.2 Carrera DME Location
Step 1. Push back the passenger seat and raise up it as far as it will go
Step 2. Peel pack the carpet at the seat end so that its in the foot well, no need to remove it totally
Step 3. Undo the two screws holding the seat motor cover in place
Step 4. There should be a silver box bolted to the floor which is your goal. It is secured by four nuts, use the socket spanner to remove the nuts and washers
Step 5. Ease the ECU straight up and over the bolts and pull from under the seat
Step 6. The data cable has is not fragile so don't be afraid to get it where you want it; one end has a clip the other end has a hook. Hold the ECU and unclip before trying to unhook
Step 7. Take the ECU to the kitchen and use a worktop - I say this so that you minimise the chance of static from carpets etc that could damage the chip
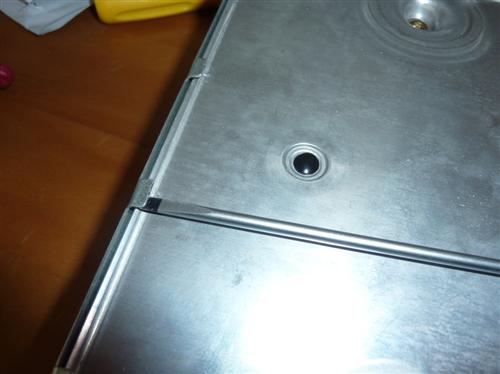
Step 8. Flip the ECU over so that you can see a series of tabs along each side; if there are some scratch marks under the tabs, its likely there may well already be an after market chip in there
Porsche 911 3.2 Carrera DME Case Tabs
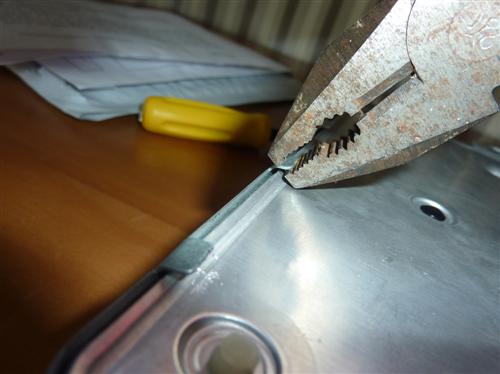
Opening tabs on Porsche 911 3.2 Carrera

Step 9. Using a non magnetic flat head screw driver pry up the tabs, then use pliers to pull up
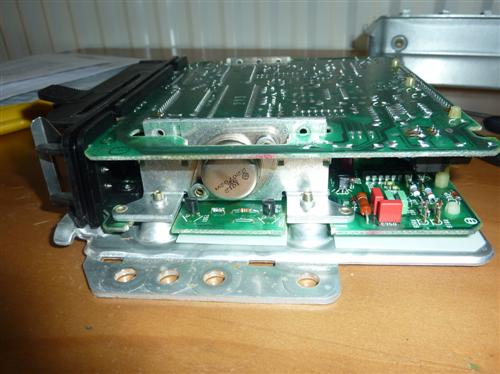
Step 10. Pulling off the cover should then reveal the circuit board which is in a sandwich like format

Advertise with Channel P101tv | The Porsche Channel

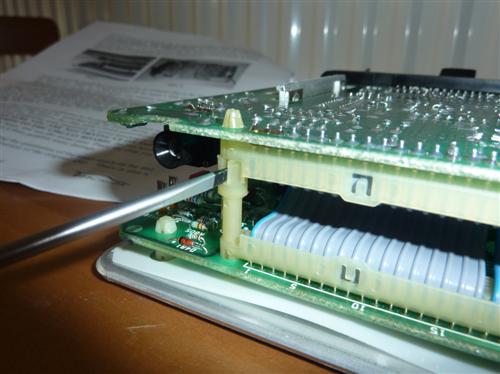
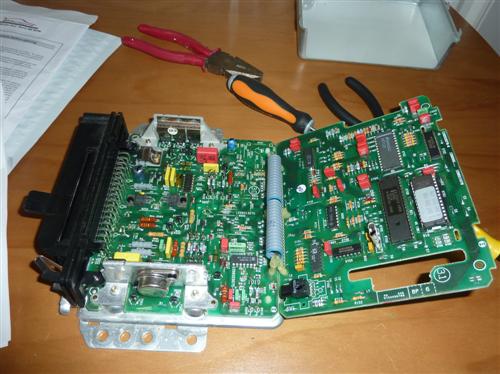
Step 11. Using a flat blade non magnetic screw driver, prize the white posts apart, then using your thumb and finger on the cable connector blocks rather than the edges of the circuit board push apart
Porsche 911 3.2 Carrera dual layer circuit board
porsche 911 3.2 Carrera DME circuit board

Step 12. The front end of the circuit board may well be glued to the external connectors so don't try to force apart until you've taken the glue off. It might well be two push down tabs that you need to press
Step 13. Once the boards are apart, the chip is located on the bottom right of the right hand board; there is a notch in the chip and you'll need to remember which way its positioned
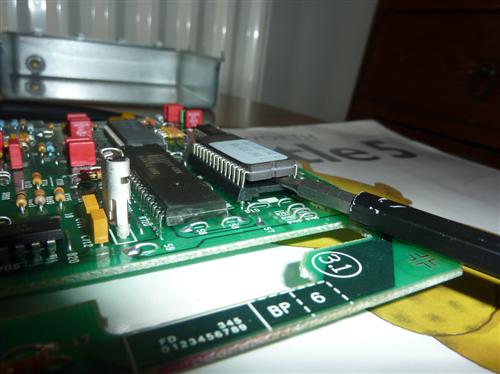
Step 14. Ease a non magnetic screw driver between the chip and chip holder frequently changing ends until it can be picked up using only the black body of the chip
Porsche 911 3.2 Carrera DME Circuit Board
Porsche 911 3.2 Carrera DME main chip

Step 15. Holding only the black of the Steve Wong chip, insert it gently but firmly ensuring the pins are aligned to the chip holder holes. Its in when the thinner parts of the chip pins can't be seen
Step 16. Fold back up the circuit board but don't put the case back on
Step 17. Go back out to the car and re-attach the data cable, remember to do the hook first
Step 18. Test start the car and let it run for a few minutes. If it doesn't start make sure the chip is firmly seated
Step 19. Assuming its working unclip the data cable and put the cover fully on, re-attach data cable, bolt back to floor, put back seat motor cover and carpet
Step 20. Go for a drive, when the engine is at temperature ensure your idle speed is correct, it might well need a little adjustment

Steve suggests checking throttle linkages and micro switches too in his instructions which never hurts...have fun.

This guide was written with our thanks by Channel P101tv's "ItsAnInvestment" . Why not check out his P101tv Channel.

Get Involved in the dicussion

We think it's better to talk and would love to hear your thoughts on this article topic. Simply scroll down to read what other Channel P101tv members are saying about this article. Why not add your say. Your comments belong here! You can scroll to the end of the page or Click here to add your comments now.
Advertise with Channel P101tv | The Porsche Channel

Article Statistics


Page Views 11,584   |  Comments 10   |  Likes 6

Thumbs Up Thumbs Down

Text Comments (10 of 10)

I folllowed this article and changed my chip without an issue, just be careful prying apart the boards!


  |  Report abuse
  |  Reply
Thumbs Up Thumbs Down

Great article.  Many thanks for putting it together.  This is going to be really useful!


  |  Report abuse
  |  Reply
Thumbs Up Thumbs Down

Great article.  I've been thinking about doing mine and was worried it might be too technical.  Having read this, I'll definitely be doing it myself!


  |  Report abuse
  |  Reply
Thumbs Up Thumbs Down

It is possible that you might see an improvement in fuel economy from a chip.  But I suspect in this case you wouldn't.

  |  Report abuse
  |  Reply
Thumbs Up Thumbs Down

The price sounds great to me.  Sounds like the main improvement is not pure BHP, but more responsiveness and  and power curve.  Have you noticed any difference in fuel consumption?


  |  Report abuse
  |  Reply
Thumbs Up Thumbs Down

Reply by: ItsAnInvestment  Date: 04-10-13
 
 
Well lets say for me the mpg was no worse than before but the fun factor was waaaaay more

Great article.  Im planning a chip change at some point and this is definitely going to help get it done properly.  Thank you. agreement02


  |  Report abuse
  |  Reply
Thumbs Up Thumbs Down

Ah, good point on the insurance. Did it make a difference to yours?


  |  Report abuse
  |  Reply
Thumbs Up Thumbs Down

Reply by: ItsAnInvestment  Date: 17-06-13
 
 
No change to my insurance as it was only about a 5BHP increase.

Great article, thanks for putting it together. I've been thinking about chipping my 911 but always thought it might be too technical. Having read this article I think I'll go for it!


  |  Report abuse
  |  Reply
Thumbs Up Thumbs Down

Reply by: ItsAnInvestment  Date: 13-06-13
 
 
Hi Dave, good to hear. Send me a mail if you've got any questions. It's worth checking with your insurer first though...

Hi Pete,

Not sure about real world numbers but the 4rse dyno suggests 5 bhp, however, primary improvements are a much better torque curve, engine responsiveness and mpg. In The round definitely worth c£200 and twenty minutes of installation. More importantly did nothing to my insurance.


  |  Report abuse
  |  Reply
Thumbs Up Thumbs Down

Hi Ras - Nice article and how to guide. I have read a lot of good things about the Steve Wong chip. What sort of power/torque improvements are claimed/achived for this chip?


  |  Report abuse
  |  Reply
Thumbs Up Thumbs Down

Add your say to this topic. Your comments belong here!


There's Plenty of Articles & Guides

Our Porsche Articles and Guides archives are constantly growing. Take a look through the archives from the Articles menu or click on a preview from the carousel below.


Feel Free to Join in!

If you would like to join in, we would welcome your ideas for an artcle. If there's subject that you'd like to write about then get in touch and let us know. If the topic fits the reader's corner then we'd be pleased to publish it. You will of course receive full credit for the article as well as a link back your Channel P101tv Profile.

Share P101tv Page Share this page

Have we missed something or feel something should be added?

If there's something missing that you feel needs to be included or if something doesn't seem quite right, then please let us know. If you'd like to write an article for inclusion here then please get in touch. Just click on "Contact us" at the bottom of the page.


We hope you enjoy the Reader's Corner of the Porsche Folio!


There's Lots more to do and see on Channel P101tv

Ready to Join our world of Porsche awesomeness!

Not A Member

If you don't have a P101tv account then click here to sign up

Sign up

Already a Member

Already have a P101tv account then click here to sign in

Sign in